Scan to BIM

Collaborating in Revit

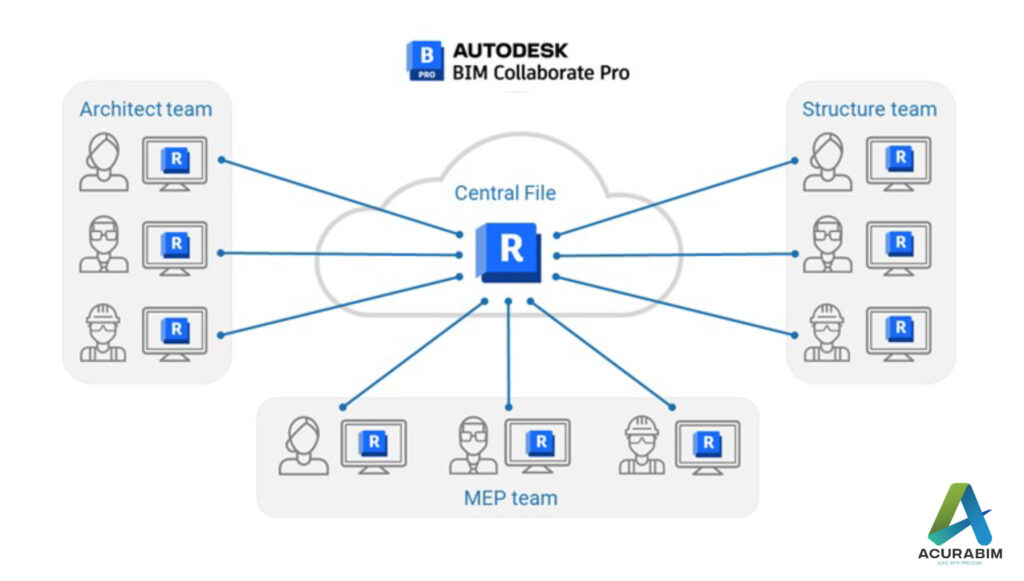
Introduction: Building Information Modelling (BIM) has revolutionized the way that architects, engineers, and construction professionals design and document building projects. One of the key tools used in BIM is Revit, which allows teams to create 3D models of buildings and their components and collaborate in real-time. However, collaborating with Revit requires careful planning and effective communication to ensure that everyone is working towards a common goal. In this blog, we will explore best practices for collaborating with Revit and discuss strategies for managing changes and resolving conflicts. 1. Setting up a Revit collaboration workflow: Before you start working with Revit, it’s important to establish a clear workflow for collaboration. This should include: • Defining roles and responsibilities: Each team member should have a clear understanding of their role and responsibilities within the project. For example, one team member may be responsible for creating the initial Revit model, while another may be responsible for updating the model as changes are made. • Establishing a central file server: All Revit files should be stored on a central file server that can be accessed by all team members. This will help to ensure that everyone is working with the most up-to-date version of the model. • Creating a shared project calendar: A shared project calendar can help team members to coordinate their work and stay on track. This can be as simple as an Excel spreadsheet or a more sophisticated project management tool like Asana or Trello. 2. Managing changes and resolving conflicts: As the Revit model evolves, it’s likely that changes will be made by different team members at different times. It’s important to have a system in place for managing these changes and resolving conflicts that may arise. Here are a few tips: • Use Revit’s version control features: Revit includes a range of version control features that allow you to track and manage changes to the model. For example, you can use the “Compare” tool to see the differences between two versions of the model, or use the “Worksets” feature to allow multiple team members to work on different parts of the model simultaneously. • Communicate clearly and regularly: good communication is key to successful collaboration. Make sure to have regular check-ins with your team and be clear about any changes or updates you make to the model. • Use conflict resolution tools: If conflicts do arise, there are a number of tools that can help you resolve them. For example, you can use the “Audit” tool in Revit to identify and fix any errors in the model, or use the “Revision Cloud” feature to highlight areas of the model that need attention. Conclusion: Collaborating with Revit can be a challenging but rewarding experience. By setting up a clear workflow and using the tools and features available in Revit, you can ensure that your team is working efficiently and effectively towards a common goal. With careful planning and good communication, you can successfully navigate the complexities of BIM and deliver high-quality building projects.

Collaborating in Revit Read More »
Scan To BIM in Revit

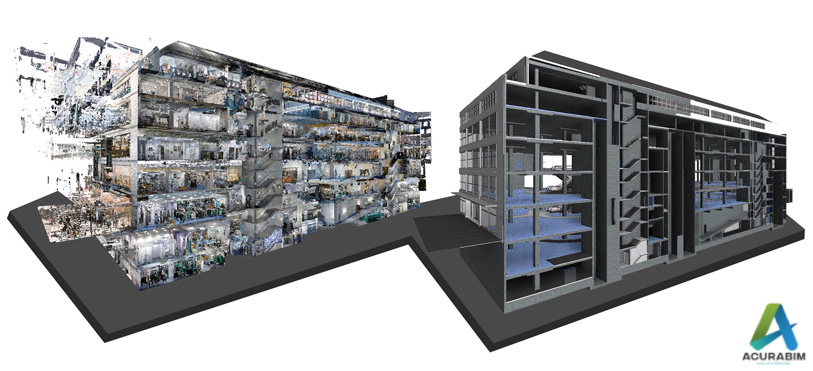
Scan To BIM in Revit: Scan to BIM (Building Information Modelling) is a process of creating a digital 3D model of a physical building or structure using point cloud data obtained from laser scanners or other digital imaging technologies. This process allows architects, engineers, and construction professionals to create accurate, detailed, and up-to-date models of existing structures, which can be used for various purposes such as renovation, retrofitting, and facility management. Here are some pointers on how to perform Scan to BIM in Revit:  Obtain point cloud data: The first step in the Scan to BIM process is to obtain accurate point cloud data of the physical building or structure. This can be done using laser scanners, photogrammetry, or other digital imaging technologies. Clean and organize the point cloud data: Once you have the point cloud data, it is important to clean and organize it to ensure that it is ready for use in Revit. This may involve removing excess data, aligning the point cloud with a known coordinate system, and organizing the data into logical groups or layers. Import the point cloud data into Revit: Once the point cloud data is organized, it can be imported into Revit using the “Import Point Cloud” tool. This tool allows you to select the point cloud file and specify the coordinate system, scaling, and other relevant parameters. Create a 3D model from the point cloud data: Once the point cloud data is imported into Revit, you can use it to create a 3D model of the physical building or structure. This can be done by selecting points or groups of points from the point cloud and creating 3D elements such as walls, floors, roofs, and so on. Add annotations and details to the model: As you create the 3D model, you can also add annotations and details such as dimensions, notes, and materials to provide more information about the building or structure. Use the 3D model for various purposes: Once the 3D model is complete, it can be used for various purposes such as renovation, retrofitting, facility management, and more. You can also use the model to generate 2D construction documents, create visualizations and animations, and perform structural and MEP analysis. In summary, Scan to BIM in Revit involves obtaining point cloud data of a physical building or structure, importing the data into Revit, creating a 3D model from the data, adding annotations and details to the model, and using the model for various purposes. By following these steps, you can create accurate and detailed digital models of existing structures, which can be used for a wide range of purposes in the architecture, engineering, and construction industries. Application of Scan to BIM: As-built documentation: Scan to BIM can be used to create an accurate, digital representation of an existing building, which can be used for as-built documentation and record-keeping purposes. Renovations and retrofits: Scan to BIM can be used to create a detailed model of an existing building, which can be used to plan and execute renovations or retrofits. Facility management: A BIM model created using Scan to BIM can be used to manage and maintain a building over time, including tasks such as tracking equipment, scheduling maintenance, and identifying potential issues. Energy analysis: A BIM model created using Scan to BIM can be used to analyse a building’s energy performance and identify opportunities for energy efficiency improvements. Coordination: A BIM model created using Scan to BIM can be used to coordinate the design and construction of a project, ensuring that all stakeholders have access to the same accurate, up-to-date information about the project.

Scan To BIM in Revit Read More »

Scroll to Top
×

Hello!

Click one of our contacts below to chat on WhatsApp

× How can I help you?